안녕하세요, 광토리입니다.
우분투에서 Certbot을 이용하여 Let's Encrypt SSL 인증서 발급은 생각보다 쉬운데요, 윈도우에서는 Certbot이 Nginx에 conf 파일을 자동으로 작성하지 못하기 때문에 수동으로 써줘야해서 난이도가 살짝 있는 편입니다. 하지만 그렇게 어려운 것은 아니니까 잘만 따라오시면 쉽게 할 수 있습니다!
먼저, 인증서를 발급 받기 위해서는 80 포트가 개방되어 있어야합니다. 전 SK 브로드밴드라서 80 포트가 열려있지만, U+ 같은 경우에는 80 포트가 막혀있기 때문에 못한다고 들었는데... 또 할 수 있는 방법이 있다고 하더라구요.
먼저 포트포워딩을 해야합니다. 포트포워딩이 됐는지 확인은 다음 링크에서 가능하니 참고해 주세요. https://www.yougetsignal.com/tools/open-ports/
Open Port Check Tool - Test Port Forwarding on Your Router
www.yougetsignal.com
먼저 Nginx를 설치해 줍니다. https://nginx.org/
nginx news
2021-04-20nginx-1.20.0 stable version has been released, incorporating new features and bug fixes from the 1.19.x mainline branch — including OCSP validation of client SSL certificates, the ssl_reject_handshake and ssl_conf_command directives, simplifi
nginx.org

그 다음, Certbot을 설치해 줍니다. https://certbot.eff.org/lets-encrypt/windows-nginx
Certbot - Windows Nginx
a project of the Electronic Frontier Foundation certbot instructions To use Certbot, you'll need... comfort with the command line command line ...and an HTTP website HTTP website that is already online already online with an open port 80 port 80 ...which i
certbot.eff.org
둘 다 설치해 주셨으면, cmd를 관리자 권한으로 실행해 주세요.
certbot --help다음 명령어를 쳐서 Certbot이 정상적으로 설치 되었는지 확인해 주세요. 아마 처음 설치할 때 이메일과 약관 동의하냐고 물어볼꺼에요. 입력하고, 동의한다고 하시면 됩니다.
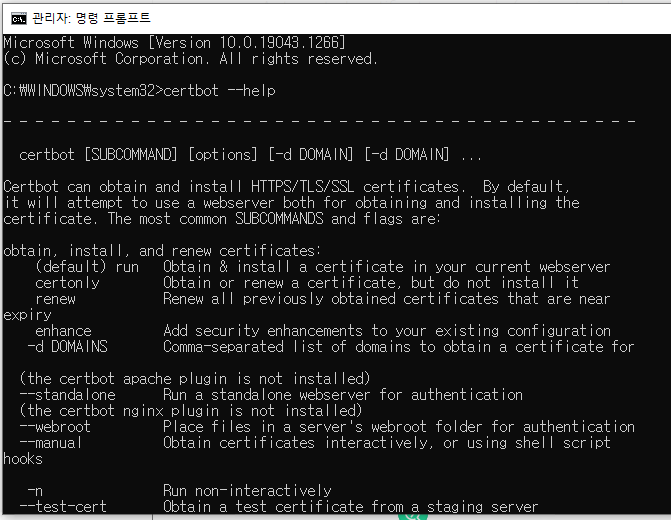
이런 식으로 나오면 성공입니다.

도메인을 SSL 인증서를 발급받을 컴퓨터의 IP로 설정합니다.
certbot certonly --standalone을 쳐서 SSL 인증서를 발급받습니다. 인증서 발급은 Let's Encrypt 특성 상 성공과 실패 상관없이 한 도메인은 5회 제한, 루트 도메인 주 50회 이상 발급 신청을 하게 되면 제한이 걸려서 발급 받을 수가 없으니 주의해 주세요. (중간에 취소는 제외) https://letsencrypt.org/docs/rate-limits/
속도 제한 - Let's Encrypt - 무료 SSL/TLS 인증서
마지막 업데이트:Jun 4, 2019 | 모든 문서를 참조 참고: 번역 이후 영어 버전이 업데이트되었습니다 (Jul 12, 2021) 영어로 보기 Let’s Encrypt는 가능한 한 많은 사람들이 공정하게 사용할 수 있도록 속도
letsencrypt.org
    server {
        listen       443 ssl;
        server_name  (도메인);

        ssl_certificate      C:\Certbot\live\(도메인)\cert.pem;
        ssl_certificate_key  C:\Certbot\live\(도메인)\privkey.pem;

        ssl_session_cache    shared:SSL:1m;
        ssl_session_timeout  5m;

        ssl_ciphers  HIGH:!aNULL:!MD5;
        ssl_prefer_server_ciphers  on;
    }
다시 Nginx 파일로 들어가서 conf -> nginx.conf 파일을 메모장으로 열어주고, http 구문의 맨 아래에 다음 내용을 추가해 줍니다.
nginx -s reload그리고 재부팅해 주시면 끝!
'IT(인터넷) 관련' 카테고리의 다른 글
| Nginx의 리버스 프록시에 대해 알아보고 사용해 보기 (450) | 2021.10.04 |
|---|---|
| Nginx 간단한 명령어 알아보기 (윈도우, 우분투) (100) | 2021.10.04 |

댓글